
How to Fix Windows 11 WiFi Keeps Disconnecting
If your Windows 11 WiFi keeps disconnecting, the problem may be caused by a Wi-Fi driver, network settings, power management, weak signal, router issues, or wireless interference.
Before trying advanced fixes, check whether other devices also disconnect from the same network. If they stay connected, the problem is more likely related to your Windows 11 PC.
In this guide, you’ll find 10 practical fixes, starting with simple checks and moving to more advanced solutions.
Why Does Windows 11 WiFi Keep Disconnecting?
Common causes include:
- Outdated or corrupted Wi-Fi drivers
- Saved network profile problems
- Windows network configuration issues
- Wi-Fi adapter power settings
- Weak signal or interference
- Router or Internet connection problems
- Wi-Fi adapter or hardware issues
1. Check Whether Other Devices Also Disconnect
Before changing anything on Windows 11, test another device.
Connect your smartphone, tablet, or another computer to the same Wi-Fi network and use it for several minutes.
If every device disconnects
The problem may be related to:
- Your router
- Your modem
- Your Internet service
- Wireless interference
- Your Internet provider
In this situation, changing Windows settings probably won’t solve the underlying problem.
If only your Windows 11 computer disconnects
The problem is more likely related to:
- Your Wi-Fi adapter
- The wireless driver
- Windows network settings
- Power management
- The saved Wi-Fi profile
This simple test can save you a lot of troubleshooting time.
2. Restart Your Router and Windows 11 PC
A temporary networking problem can sometimes cause repeated Wi-Fi disconnections.
Start with a simple restart.
Restart your router
- Turn off your router.
- Unplug its power cable.
- Wait approximately 30 seconds.
- Plug the router back in.
- Wait until the Wi-Fi network becomes available.
- Restart your Windows 11 PC.
- Reconnect to your wireless network.
Microsoft also recommends restarting the modem or wireless router as part of general Wi-Fi troubleshooting.
If the connection becomes stable afterward, the issue may have been temporary.
3. Forget the Wi-Fi Network and Reconnect
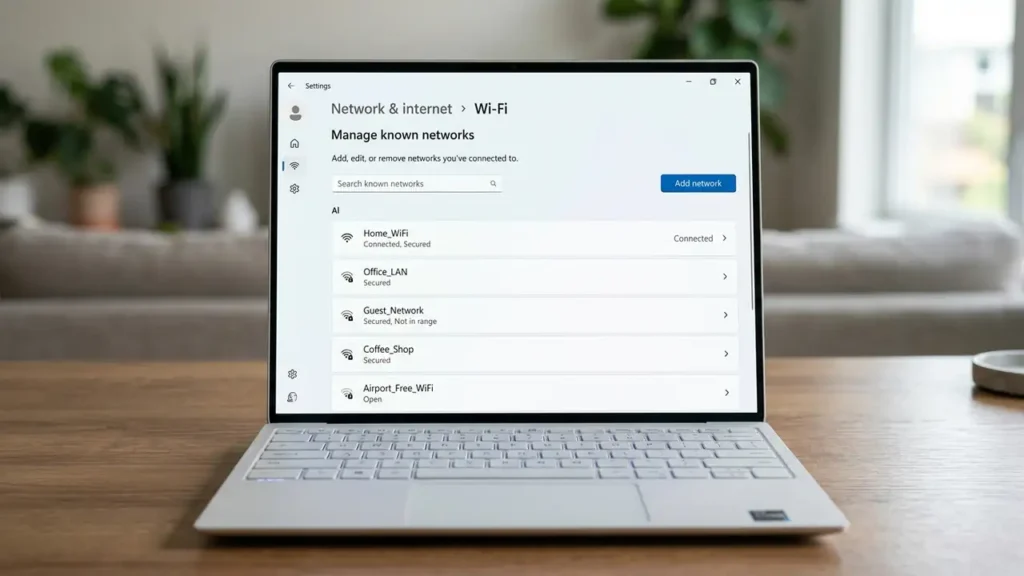
If Windows 11 has an outdated or corrupted saved network profile, forgetting the network and reconnecting can help.
Follow these steps:
- Press Windows + I to open Settings.
- Select Network & internet.
- Select Wi-Fi.
- Open Manage known networks.
- Find your wireless network.
- Select Forget.
- Open the available Wi-Fi networks.
- Select your network.
- Enter your Wi-Fi password.
- Select Connect.
Microsoft specifically recommends forgetting the saved Wi-Fi network and reconnecting when troubleshooting wireless connection problems.
Why can this help?
Windows stores information about networks you’ve previously connected to. If that saved configuration becomes problematic, removing it forces Windows to create a fresh connection profile.
Screenshot suggestion: Add your own Windows 11 screenshot here showing Manage known networks.
4. Run Windows 11 Network Troubleshooting
Windows 11 includes automated troubleshooting tools that can diagnose common network problems.
Microsoft currently recommends starting with the automated Network and Internet troubleshooter in the Get Help app for Windows 11.
How to use it
- Open the Get Help app.
- Search for Wi-Fi connection problems.
- Follow the troubleshooting instructions.
- Allow Windows to run its network diagnostics.
- Apply any recommended solution.
- Test your Wi-Fi connection again.
If Windows identifies a specific problem, follow the recommended instructions before moving to more advanced solutions.
5. Update Your Wi-Fi Driver
An outdated, incompatible, or corrupted wireless driver can cause frequent disconnections.
This is particularly important if the problem started after a Windows update, driver change, or system upgrade.
Update your Wi-Fi driver
- Right-click the Start button.
- Select Device Manager.
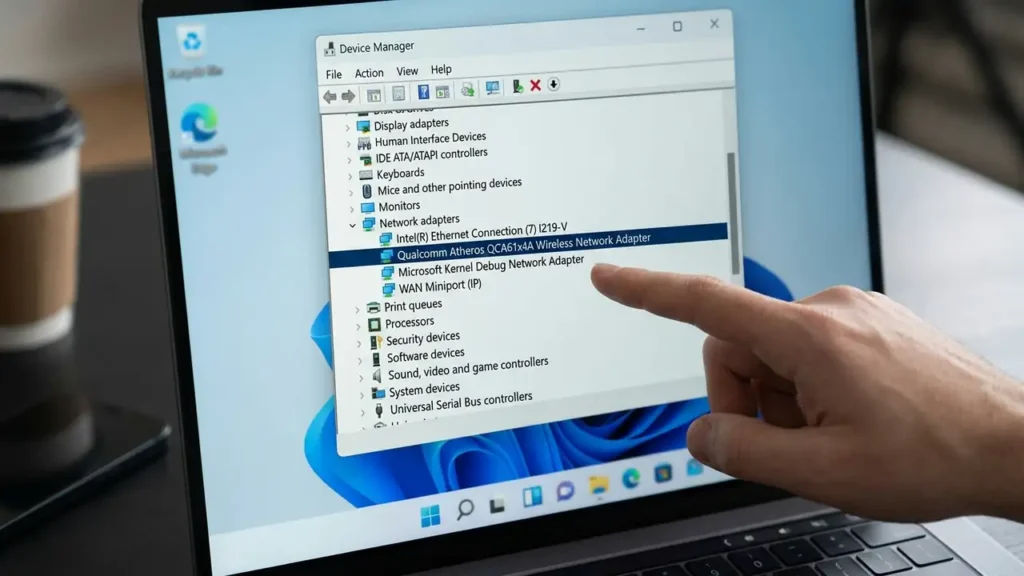
- Expand Network adapters.
- Find your wireless adapter.
- Right-click the adapter.
- Select Update driver.
- Choose the available automatic search option.
If Windows doesn’t find a suitable driver, check the official support website for your laptop or Wi-Fi adapter manufacturer.
For example, if you have an HP laptop, look for the driver on HP’s official support website rather than downloading unknown driver packages from random websites.
Microsoft also recommends checking the manufacturer’s website for the latest network adapter driver when troubleshooting persistent Wi-Fi problems.
Screenshot suggestion: Add your own screenshot showing Device Manager → Network adapters.
6. Reinstall the Wi-Fi Adapter Driver
If updating the driver doesn’t solve the problem, reinstalling it may help.
A driver can sometimes become corrupted or incompatible with the current Windows configuration.
Before you uninstall the driver
If possible, download the correct Wi-Fi driver from your computer manufacturer’s official website first.
This is especially important if your PC may lose its wireless connection after the driver is removed.
Reinstall the driver
- Right-click Start.
- Select Device Manager.
- Expand Network adapters.
- Right-click your Wi-Fi adapter.
- Select Uninstall device.
- Confirm the removal.
- Restart your computer.
Windows may automatically detect the wireless adapter and reinstall the driver after restarting.
Microsoft recommends this approach as one of the troubleshooting options when network connectivity problems persist, particularly when problems appear after a recent update.
7. Check Wi-Fi Adapter Power Management
Windows can use power-management features to reduce energy consumption.
On some computers, checking the wireless adapter’s power-management configuration can help when Wi-Fi repeatedly disconnects.
Try this:
- Open Device Manager.
- Expand Network adapters.
- Right-click your Wi-Fi adapter.
- Select Properties.
- Open the Power Management tab if it is available.
- Look for:
Allow the computer to turn off this device to save power
- If the option is enabled, test the connection with it disabled.
- Select OK.
Not every Wi-Fi adapter or driver provides the same power-management options.
Microsoft also documents this setting as a troubleshooting step for frequent Wi-Fi connection drops.
Screenshot suggestion: Add your own screenshot of the Wi-Fi adapter’s Power Management tab.
8. Move Your Computer Closer to the Router
Sometimes the problem isn’t Windows 11.
A weak Wi-Fi signal can cause unstable connections, especially when your computer is far from the router or separated by several walls.
Try moving your computer closer to the router and monitor the connection.
If the connection becomes stable
Your problem may be related to:
- Distance
- Walls or physical obstacles
- Wireless interference
- Router placement
- Wi-Fi frequency or band
If your router provides different wireless bands, testing another available band can also help determine whether signal conditions are contributing to the problem.
9. Test Another Wi-Fi Network
Another useful diagnostic step is to connect your Windows 11 PC to a different wireless network.
For example, you can temporarily test:
- A smartphone hotspot
- Another home Wi-Fi network
- A trusted Wi-Fi connection
Then monitor the connection.
If Windows 11 disconnects from every network
The problem is more likely related to:
- The Wi-Fi driver
- The wireless adapter
- Windows configuration
- Hardware
If it only disconnects from your home Wi-Fi
The problem may be related to:
- Your router
- Wireless interference
- Signal strength
- Router configuration
Testing another network is one of the easiest ways to separate a computer problem from a network problem.
10. Reset the Network Stack Using Command Prompt
If the simpler fixes haven’t worked, you can reset several Windows networking components manually.
This method is more advanced, so make sure you enter the commands exactly as shown.
Open Command Prompt as administrator
- Open Windows Search.
- Type Command Prompt.
- Right-click Command Prompt.
- Select Run as administrator.
- Confirm the Windows security prompt.
Then run these commands one at a time:
netsh winsock reset
Press Enter.
Then:
netsh int ip reset
Press Enter.
Next:
ipconfig /release
Then:
ipconfig /renew
Finally:
ipconfig /flushdns
Restart your computer after running the commands.
Microsoft includes these commands in its Windows Wi-Fi troubleshooting guidance to reset networking components, renew the IP configuration, and clear the DNS resolver cache.
11. Check Windows Update and Manufacturer Updates
If your Wi-Fi problem started recently, check for available Windows updates.
Go to:
Settings → Windows Update
Then select:
Check for updates
Install available updates and restart your computer if Windows asks you to.
You should also check your laptop or Wi-Fi adapter manufacturer’s support page for driver updates.
Why check both?
Windows Update may provide a general driver or operating-system update, while your computer manufacturer may provide a driver specifically tested for your device.
If the Wi-Fi problem started immediately after a particular update, check your update history and manufacturer support information before making major changes.
12. Use Network Reset as a Last Resort
If Windows 11 WiFi keeps disconnecting after you’ve tried the previous solutions, Network Reset is one of the more advanced options available in Windows 11.
Microsoft recommends using network reset as a last resort because it removes installed network adapters and resets their settings to their defaults.
How to perform a Network Reset
- Open Settings.
- Select Network & internet.
- Select Advanced network settings.
- Scroll down.
- Select Network reset.
- Select Reset now.
- Confirm the reset if Windows asks.
- Allow the computer to restart.
Afterward, you may need to reconnect to your Wi-Fi network.
You may also need to reconfigure certain network software, such as VPN clients or virtual network adapters. Microsoft notes that Network Reset can reinstall network adapters and restore their associated settings to their defaults.
Screenshot suggestion: Add your own screenshot showing Advanced network settings → Network reset.
Quick Checklist: Windows 11 WiFi Keeps Disconnecting
| Problem | What to Try First |
|---|---|
| All devices disconnect | Check the router and Internet connection |
| Only Windows 11 disconnects | Check the Wi-Fi driver and network settings |
| Started after an update | Check Windows Update and the Wi-Fi driver |
| Disconnects when idle | Check power-management settings |
| Works near the router | Check signal strength and interference |
| Disconnects on every Wi-Fi network | Check the adapter, driver, or hardware |
| Saved network seems problematic | Forget and reconnect |
| Nothing else works | Try Network Reset |
Frequently Asked Questions
How do I stop Windows 11 WiFi from disconnecting?
Start by checking whether other devices have the same problem. Then restart your router, forget and reconnect to the Wi-Fi network, run Windows network troubleshooting, update the Wi-Fi driver, and check the adapter’s power-management settings.
Why does my Windows 11 WiFi keep disconnecting randomly?
Random Wi-Fi disconnections can be caused by driver problems, network configuration issues, power management, weak signal, interference, router problems, or hardware issues.
Can an outdated Wi-Fi driver cause disconnects?
Yes. An outdated, corrupted, or incompatible wireless driver can cause unstable Wi-Fi connections. Updating or reinstalling the driver is one of the troubleshooting steps worth trying.
Should I reset network settings on Windows 11?
Network Reset can help with persistent connectivity problems, but it should generally be used after simpler troubleshooting methods. It resets network adapters and settings, so you may need to reconnect to wireless networks and reconfigure some network software afterward.
What should I do if Wi-Fi works on my phone but not Windows 11?
Test the Windows 11 computer on another Wi-Fi network or smartphone hotspot. If it disconnects from other networks too, focus on the PC’s driver, adapter, and Windows settings.
More Windows 11 Troubleshooting Guides
Still having problems with your devices? Check out these related guides for more step-by-step solutions:
How to Fix Chrome Not Responding on Windows 11
How to Fix Bluetooth Not Working on Windows 11
Final Thoughts
If Windows 11 WiFi keeps disconnecting, start by checking whether the problem affects other devices. Then restart your router, reconnect to the network, update or reinstall the Wi-Fi driver, and check power-management settings.
If the problem continues, test another Wi-Fi network before using Network Reset as a last resort.